A dull paper cutter blade turns simple trimming tasks into frustrating struggles with torn edges and stubborn resistance. If your guillotine cutter requires multiple passes or leaves ragged cuts on cardstock, the blade has likely lost its edge. The good news? Most paper cutter blades can be restored through proper sharpening techniques, saving you the cost of replacement. This guide covers everything you need to know about how to sharpen a paper cutter blade, including DIY methods, professional service options, and when replacement makes more sense. You’ll learn the required tools, step-by-step procedures, and maintenance practices that extend blade life for years.
Recognizing When Your Blade Needs Sharpening
Ragged or Torn Paper Edges
A properly sharpened blade slices cleanly through paper fibers in one motion. When it dulls, it tears instead of cuts, producing frayed or jagged edges. This problem becomes especially noticeable on thicker materials like cardstock, photo paper, or heavyweight stocks. If your finished cuts look fuzzy or uneven, dulling is the most likely cause.
Increased Cutting Resistance
You should be able to pull the cutting lever down with smooth, consistent pressure. When you feel resistance or need to force the blade through the paper, the edge has worn. This added strain not only affects cut quality but can also damage the cutter’s internal mechanism over time, leading to costly repairs.
Multiple Passes Required for Single Sheets
A sharp blade cuts through standard paper in one smooth motion. If you find yourself making two or more passes to slice through a single sheet, the blade has reached moderate to severe dulling. This often indicates the edge is no longer making full, even contact along its entire length.
Visible Nicks, Chips, or Wear Patterns
Inspect the blade edge under bright lighting by running a flashlight at a low angle to catch reflections off imperfections. Look for small chips, uneven wear patterns, or dark spots indicating corrosion. Always wear cut-resistant gloves during inspection and never touch the edge directly, even if the blade feels dull.
Inspecting the Blade Before Sharpening
Checking for Cracks, Warping, and Structural Damage
Not every dull blade can be saved through sharpening. Before starting, inspect carefully for cracks, warping, or deep gouges. Even small fractures compromise blade strength and safety. A bent blade cannot cut evenly and cannot be repaired by sharpening alone. As a general rule, if structural damage is visible to the naked eye, replacement is the safer choice over attempting to sharpen.
Identifying Your Blade Type
Knowing your blade type determines your sharpening approach:
- Fixed blades are permanently mounted to the cutter and must be sharpened in place or removed carefully
- Replaceable blades are designed for quick swaps and are often more cost-effective to replace than sharpen
Consult your model’s manual or the manufacturer’s website to confirm blade type and compatibility before proceeding.
Determining If the Blade Can Be Removed
Some models allow complete blade removal, while others require in-place maintenance. Check for release levers, locking mechanisms, or specific screw configurations. If removal isn’t possible, ensure the cutter is locked in the fully open position before starting any work. This prevents accidental closure and serious injury.
Essential Tools for Sharpening a Paper Cutter Blade

Sharpening Stone (1000–3000 Grit)
A fine-grit sharpening stone in the 1000 to 3000 grit range provides the precision needed for paper cutter blades. Three main types are available:
- Oil stones require honing oil, are durable, and last a long time
- Water stones need to be soaked before use, cut faster but wear quicker
- Diamond hones are aggressive and effective but require an angle guide for consistent results
Avoid coarse stones below 1000 grit unless you’re reshaping a severely damaged edge.
Lubrication: Honing Oil or Water
Proper lubrication prevents overheating during sharpening and carries away metal particles. Use honing oil with oil stones, water with water stones, and either dry or water with diamond hones. Apply just enough to keep the stone’s surface wet throughout the sharpening process.
Leather Strop and Honing Compound
After sharpening, a leather strop with honing compound removes the micro-burr (a tiny metal lip left after grinding) and polishes the edge. This step refines the cutting surface and extends sharpness longevity. A soft cloth works as a substitute, but leather delivers noticeably better results.
Safety Gloves and Cleaning Supplies
Cut-resistant gloves are mandatory when handling blades, even dull ones. You’ll also need a soft cloth, a cleaning brush (nylon or brass), and compressed air to clear debris from crevices. Always clean the blade and cutting bed before sharpening to prevent particles from damaging the stone’s surface.
Step-by-Step Guide to Sharpening a Paper Cutter Blade
Step 1: Remove and Clean the Blade
If your model allows removal, lock the cutter in the open position, loosen mounting screws or release levers, and carefully slide the blade out. Then clean it thoroughly by wiping with a dry cloth, brushing away paper fibers, and using compressed air to blow out debris. A clean blade ensures even contact with the sharpening stone.
Step 2: Secure the Blade for Sharpening
For removed blades, clamp the blade in a vise with soft jaws or padding to prevent damage while keeping the cutting edge accessible. For in-place sharpening, lock the blade arm securely and use tape or a stop block to prevent any accidental movement. Stability is critical for both consistent angle control and your personal safety.
Step 3: Sharpen at the Correct Angle
Hold the stone at a 15 to 20 degree angle, which matches most factory edges. Use an angle guide if available, or practice on scrap metal first to develop consistency. Starting at the base of the blade, draw the stone along the edge toward the tip with light, even pressure. Repeat 10 to 15 times per side, then flip the blade and repeat on the opposite side to maintain symmetry.
Step 4: Maintain Consistent Pressure Throughout
Uneven pressure creates a wavy edge that won’t cut properly. Focus on smooth, controlled strokes with full-length contact between stone and blade. Avoid “rocking” the stone at either end. A helpful technique: mark the bevel with a Sharpie marker before sharpening. After each pass, check whether the ink is being removed evenly. This reveals inconsistencies in your angle or pressure before they become problems.
Step 5: Strop to Polish the Edge
After sharpening is complete, apply a small amount of honing compound to the leather strop. Draw the blade edge across the strop at the same 15 to 20 degree angle, alternating directions 10 to 15 times. This step removes the micro-burr and refines the cutting edge for paper-smooth performance.
Step 6: Reassemble and Test
Reinstall the blade securely according to manufacturer guidelines, then test the cutter with a single sheet of standard paper. A properly sharpened blade should cut cleanly in one smooth pass. If the blade still struggles, repeat the sharpening process or consider professional service.
In-Place Sharpening vs. Blade Removal

Sharpening Without Removing the Blade
Some paper cutters don’t allow blade removal. To sharpen in place, lock the blade in the fully raised position and use a narrow stone or diamond file to access the edge. Work slowly from base to tip, maintaining your angle throughout. The main challenge is limited space, which makes angle control more difficult. A guide or template helps maintain accuracy when working in tight quarters.
Benefits of Removing the Blade First
Removing the blade provides full access to the entire edge, better control over angle and pressure, and safer handling with proper clamping. It also makes cleaning and inspection much easier. When possible, removal is always the preferred sharpening method for superior results.
Professional Sharpening Service Options
Local Industrial Tool Shops
Many industrial tool shops sharpen paper cutter blades for approximately $15. Standard blade types work with their existing equipment. When calling ahead, ask specifically whether they sharpen straight-edge guillotine blades, what their turnaround time is, and whether they have a fixture to maintain the correct angle. Bring the blade clean and clearly labeled for safe handling.
Local Metal and Knife Shops
Metal shops that service kitchen knives often handle paper cutter blades too, typically for under $20. These shops already have the equipment and expertise needed for straight-edge sharpening. Simply bring your blade in and ask if they can perform the service. This is often a convenient, budget-friendly option for standard blade types.
Mail-In Sharpening Services
Services like Blade Sharpener Pro sharpen and return your blade for approximately $30. Benefits include a guaranteed perfect edge, professional equipment, and lifetime sharpening plans. This option works well if local sharpening isn’t available, though shipping adds 1 to 2 weeks to the process.
School and Institutional Facilities
Some schools and institutions have in-house maintenance teams with sharpening capabilities. Contact your facilities department to ask whether they handle equipment upkeep and whether paper cutter blade sharpening falls within their services. This option is often free or low-cost and ensures safe, professional results for educational settings.
When Blade Replacement Is the Smarter Choice
Cracked, Warped, or Structurally Damaged Blades
No amount of sharpening fixes structural damage. Replace your blade immediately if you notice cracks along the edge or body, visible bends or twists, or deep chips from foreign objects. Using a damaged blade risks inaccurate cuts and potential breakage that could cause injury.
Excessive Material Loss from Repeated Sharpening
Each sharpening session removes a small amount of metal. Over years of maintenance, the blade becomes too thin to hold an effective edge. Signs include visible flexing during cutting, inability to maintain a sharp angle, and repeated sharpening that fails to restore performance. At this stage, replacement delivers better results than continued sharpening.
Replaceable Blade Systems
Many modern cutters use standardized, replaceable blades designed for quick swapping. Advantages include minimal downtime, a guaranteed perfect edge, and often lower cost than professional sharpening. Check your manual for model-specific replacement options. Swapping takes just minutes and eliminates the learning curve of sharpening technique.
Cost Comparison: Sharpen vs. Replace
| Option | Average Cost | Time Required | Best For |
|---|---|---|---|
| DIY Sharpening | $30–$60 (initial tools) | 30–60 minutes | Occasional users, hobbyists |
| Local Tool Shop | $15 | 1–3 days | Standard blades, budget-conscious users |
| Local Metal Shop | Under $20 | 1–3 days | Those with nearby knife sharpeners |
| Mail-In Service | $30 | 1–2 weeks | Remote users, lifetime service seekers |
| Replacement Blade | $20–$50 | Under 10 minutes | Replaceable models, urgent needs |
For most users, local sharpening offers the best balance of cost, speed, and quality.
Maintenance Tips to Extend Blade Life
Clean After Every Use
Paper dust and fibers dull blades gradually with each session. Wipe the blade with a dry cloth, clean the cutting bed, and remove any adhesive residue with a mild solvent. This prevents buildup that accelerates wear and keeps your blade performing at its best.
Avoid Cutting Foreign Objects
Never cut through staples, paper clips, or laminated edges with metal components. These cause immediate nicks and chipping that require extra sharpening sessions to correct. Always remove fasteners before cutting.
Store in a Dry, Protected Environment
Humidity causes corrosion that damages blade edges over time. Store your cutter in a climate-controlled room away from sinks, windows, or exterior walls. Use a cover to prevent dust accumulation and maintain edge integrity between uses.
Sharpen Proactively, Not Reactively
Don’t wait until the blade fails completely. Sharpen when cuts start feeling slightly rough, resistance increases noticeably, or edges show minor fraying. Proactive maintenance preserves more metal, extends overall blade lifespan, and keeps your cutting performance consistent.
Critical Safety Precautions
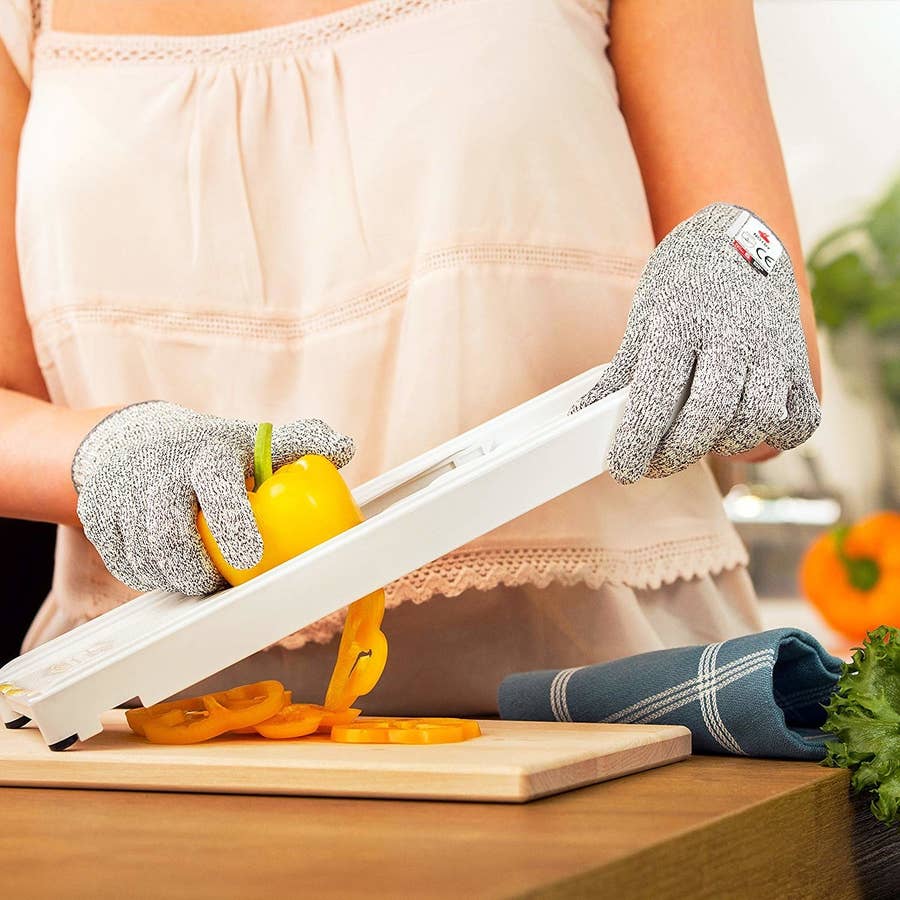
Always Wear Cut-Resistant Gloves
Blades remain extremely sharp even when dull, and a single slip can cause serious injury. Wear protective gloves whenever removing or installing the blade, handling it during sharpening, or cleaning and inspecting the edge. Invest in high-quality, flexible gloves that allow good dexterity.
Secure the Cutter Before Beginning Work
Whether you’re sharpening in place or removing the blade, lock the arm in the open position using safety pins, clamps, or the manufacturer’s locking mechanism. Never rely on gravity or friction alone to keep the blade in position. This prevents accidental closure during maintenance.
Test Sharpness Safely
Never test sharpness by running your finger along the edge, even with gloves on. Instead, use a single sheet of standard paper: feed it under the blade, lower the arm smoothly, and check whether you get a clean, one-pass cut. This gives you an accurate sharpness assessment without injury risk.
Troubleshooting Common Sharpening Problems
Blade Still Dull After Sharpening
If the blade remains dull after your sharpening session, possible causes include inconsistent angle leading to an uneven bevel, insufficient passes that didn’t fully reform the edge, or a dull stone that needs resurfacing or replacement. Repeat the process with stricter angle control and additional passes. If the blade is severely worn, DIY sharpening may not be enough; consider professional service.
Uneven Cuts After Sharpening
When one side of the cut is clean but the other drags, the likely cause is uneven sharpening pressure or blade misalignment. Resharpen with consistent pressure on both sides, then check that the blade sits parallel to the cutting bed by verifying mounting screws are properly tightened.
Chipping During Regular Use
If the blade chips shortly after sharpening, the likely culprits are a leftover micro-burr that wasn’t properly stropped, cutting foreign objects like staples or clips, or an incorrect sharpening angle. Prevent future chipping by always completing the stropping step, inspecting paper for metal fasteners, and maintaining the 15 to 20 degree angle throughout sharpening.
Final Recommendations by User Type
Home and Hobbyist Users
If you use your cutter occasionally, DIY sharpening is the most cost-effective approach. Invest in a quality 1000/3000 grit stone, learn proper technique through practice, and sharpen only when needed. This saves money over time while building useful maintenance skills.
Office and Classroom Environments
High-volume settings benefit from professional service for consistent results, minimal downtime, and warranty-safe maintenance. Use local tool shops or school facilities departments for fast, reliable service that keeps your equipment in top condition.
Industrial and High-Volume Operations
Heavy users should keep a spare blade on hand and rotate between sharpened blades to maximize uptime. Schedule regular professional sharpening and maintain detailed records of your maintenance schedule. This systematic approach ensures consistent cutting quality and prevents unexpected downtime.
Frequently Asked Questions About Sharpening Paper Cutter Blades
Can I sharpen a paper cutter blade without removing it?
Yes, some models allow in-place sharpening as long as the cutter is securely locked in position. However, maintaining a consistent angle is more difficult in tight spaces. Blade removal is preferred whenever possible for better control and more even results.
How often should I sharpen my paper cutter blade?
Sharpening frequency depends on usage volume. Heavy classroom or industrial use may require quarterly sharpening, while light home use might only need annual attention. The best approach is to sharpen when performance indicators appear, such as ragged edges, increased resistance, or multiple passes needed, rather than following a fixed schedule.
What is the difference between sharpening and honing?
Sharpening removes material to create a new edge using a stone, while honing or stropping polishes and aligns the existing edge using a leather strop. Both steps are necessary: sharpening restores the edge, and stropping refines it for optimal cutting performance.
Can I use a regular knife sharpener on a paper cutter blade?
No, knife sharpeners are designed for different blade geometries and typically don’t accommodate the long, straight edge of a paper cutter blade. Using one risks incorrect angles that damage the edge. Stick with a proper sharpening stone and the correct 15 to 20 degree technique.
How do I know if my blade is replaceable?
Check your model’s manual for blade specifications and replacement procedures. Look for release mechanisms, quick-swap features, or standardized blade designs. Contact the manufacturer directly for model-specific guidance if the manual doesn’t provide clear information.
Is professional sharpening worth the cost?
For most users, yes. Professional sharpening costs $15 to $30, which is often less than replacement blade prices, and ensures proper edge geometry. For high-volume users or those without DIY experience, professional service delivers consistent, reliable results that extend blade life significantly.
What should I do if my blade is severely damaged?
Do not attempt to sharpen blades with cracks, warping, or deep structural damage. These issues cannot be repaired through sharpening and pose safety risks. Inspect your blade before any maintenance, and replace it immediately if you find significant damage rather than attempting restoration.
Key Takeaways for Sharpening Your Paper Cutter Blade
A well-maintained paper cutter blade can deliver years of clean, precise cuts when you address dulling early and follow proper technique. The most important points to remember: inspect the blade for structural damage before sharpening, maintain a consistent 15 to 20 degree angle throughout the process, and always finish with stropping to remove the micro-burr. Whether you choose DIY sharpening for occasional use or professional service for high-volume environments, the key is acting at the first signs of dulling rather than waiting until cuts become ragged or require multiple passes. For your next step, gather the necessary tools, inspect your blade’s current condition, and decide whether DIY or professional sharpening best fits your situation and skill level.