

You don’t need an expensive binding machine to create a polished, spiral-bound notebook or booklet. With a few common household tools and the right technique, you can spiral bind a book without a machine right at your kitchen table. This method is perfect for students, crafters, teachers, and anyone who wants custom notebooks on a budget.
Manual spiral binding works best for projects up to 100 pages. While industrial machines offer speed, the DIY approach delivers clean, professional results when you focus on proper alignment and careful coil handling. Below, you’ll find every step from gathering supplies to finishing touches, plus troubleshooting tips to help you bind like a pro using only basic tools.
Gather Essential Supplies
Before you begin, collect your materials so the process runs smoothly. Preparation prevents mistakes and saves time.
Core Tools You Need
- Three-hole punch: A standard desktop punch works for most projects
- Scissors or utility knife: For trimming coil ends flush with the page edge
- Pliers (optional): Helps tighten the coil after threading
- Ruler or template: Ensures even hole spacing if you’re punching manually
Binding Materials
- Spiral binding coils: Available in plastic or wire, typically 1″ or 1.5″ diameters
- Interior pages: Standard printer paper works well
- Cover stock: Heavier cardstock (110 lb) adds durability and a professional look
Pro Tip: Buy coils in multiple colors to match your project’s theme. Bright coils work great for kids’ notebooks, while black or white suits formal reports.
Prepare Pages for Binding
Good preparation ensures clean holes and prevents text from disappearing into the binding.
Stack and Align Your Pages
- Place all pages in correct order, with the front cover on top and back cover on the bottom
- Tap the stack firmly on a flat surface so all edges align perfectly
- Use binder clips to hold pages in place while you work
Add a Spine Margin
- Leave a 0.25 to 0.5 inch margin on the left side of each page
- This space prevents text from being punched or covered by the coil
- For home-printed pages, adjust your printer settings before printing
Visual Cue: Hold the stack up and check the left edge. All pages should sit flush with no ripples or offsets.
Punch Holes Accurately
Precise hole placement is the foundation of a smooth, functional bind.
Using a Three-Hole Punch
- Align the left edge of your paper stack with the punch guide
- For stacks over 20 sheets, punch in batches of 10 to 15 pages
- Use a previously punched sheet as a template to keep holes consistent across batches
Manual Hole Punching Alternative
If your punch can’t reach all pages:
– Mark hole positions (top, middle, bottom) along the left edge with a ruler
– Pierce each mark with a single-hole punch or awl
– Verify alignment before moving to the next step
Common Mistake: Forcing too many pages into the punch causes skewed holes. This leads to a wobbly coil that doesn’t close properly.
Thread the Spiral Coil by Hand
This step replaces the machine insertion process. Take your time for the best results.
Pre-Cut the Coil to Size
- Measure your document height (letter-size pages are typically 11 inches)
- Cut the coil about 0.5 inches longer to allow for twisting
- Use wire cutters for metal coils; scissors work for plastic
Insert the Coil Step by Step
- Start at the top hole and push the coil tip straight through
- Guide it down through the middle hole, then the bottom hole
- Keep tension light and steady; never force the coil
- If you feel resistance, realign the pages and try again
Tool Hack: A thin knitting needle or dental pick helps guide the coil through stubborn holes without damaging paper.
Close and Secure the Coil

Once threaded, the coil needs a tight closure to prevent unraveling.
Twist the Ends Together
- Hold the top and bottom ends of the coil
- Twist them inward toward the center until the spiral interlocks
- Aim for a snug fit with no gaps
Tighten with Pliers
- Use needle-nose pliers to compress the twisted ends gently
- Squeeze gradually to avoid crushing plastic coils or pinching pages
- This extra step adds durability for frequently used notebooks
Warning: Over-tightening can break plastic coils or damage paper. Apply pressure slowly and check as you go.
Trim Excess Coil for a Clean Finish
Trimming makes your booklet look polished and prevents the coil from snagging on bags or clothing.
Cut Flush with the Page Edge
- Position the coil so ends extend just beyond the first and last pages
- Use sharp scissors or wire cutters to snip the coil flush with the paper
- For plastic coils, a quick snip works; metal coils may need heavier cutters
Smooth Sharp Edges
- Lightly sand cut ends with fine-grit sandpaper to remove burrs
- This step prevents paper cuts and protects surfaces the book touches
Pro Tip: Wrap trimmed ends with clear tape for extra safety on children’s notebooks.
Choose the Right Coil Size
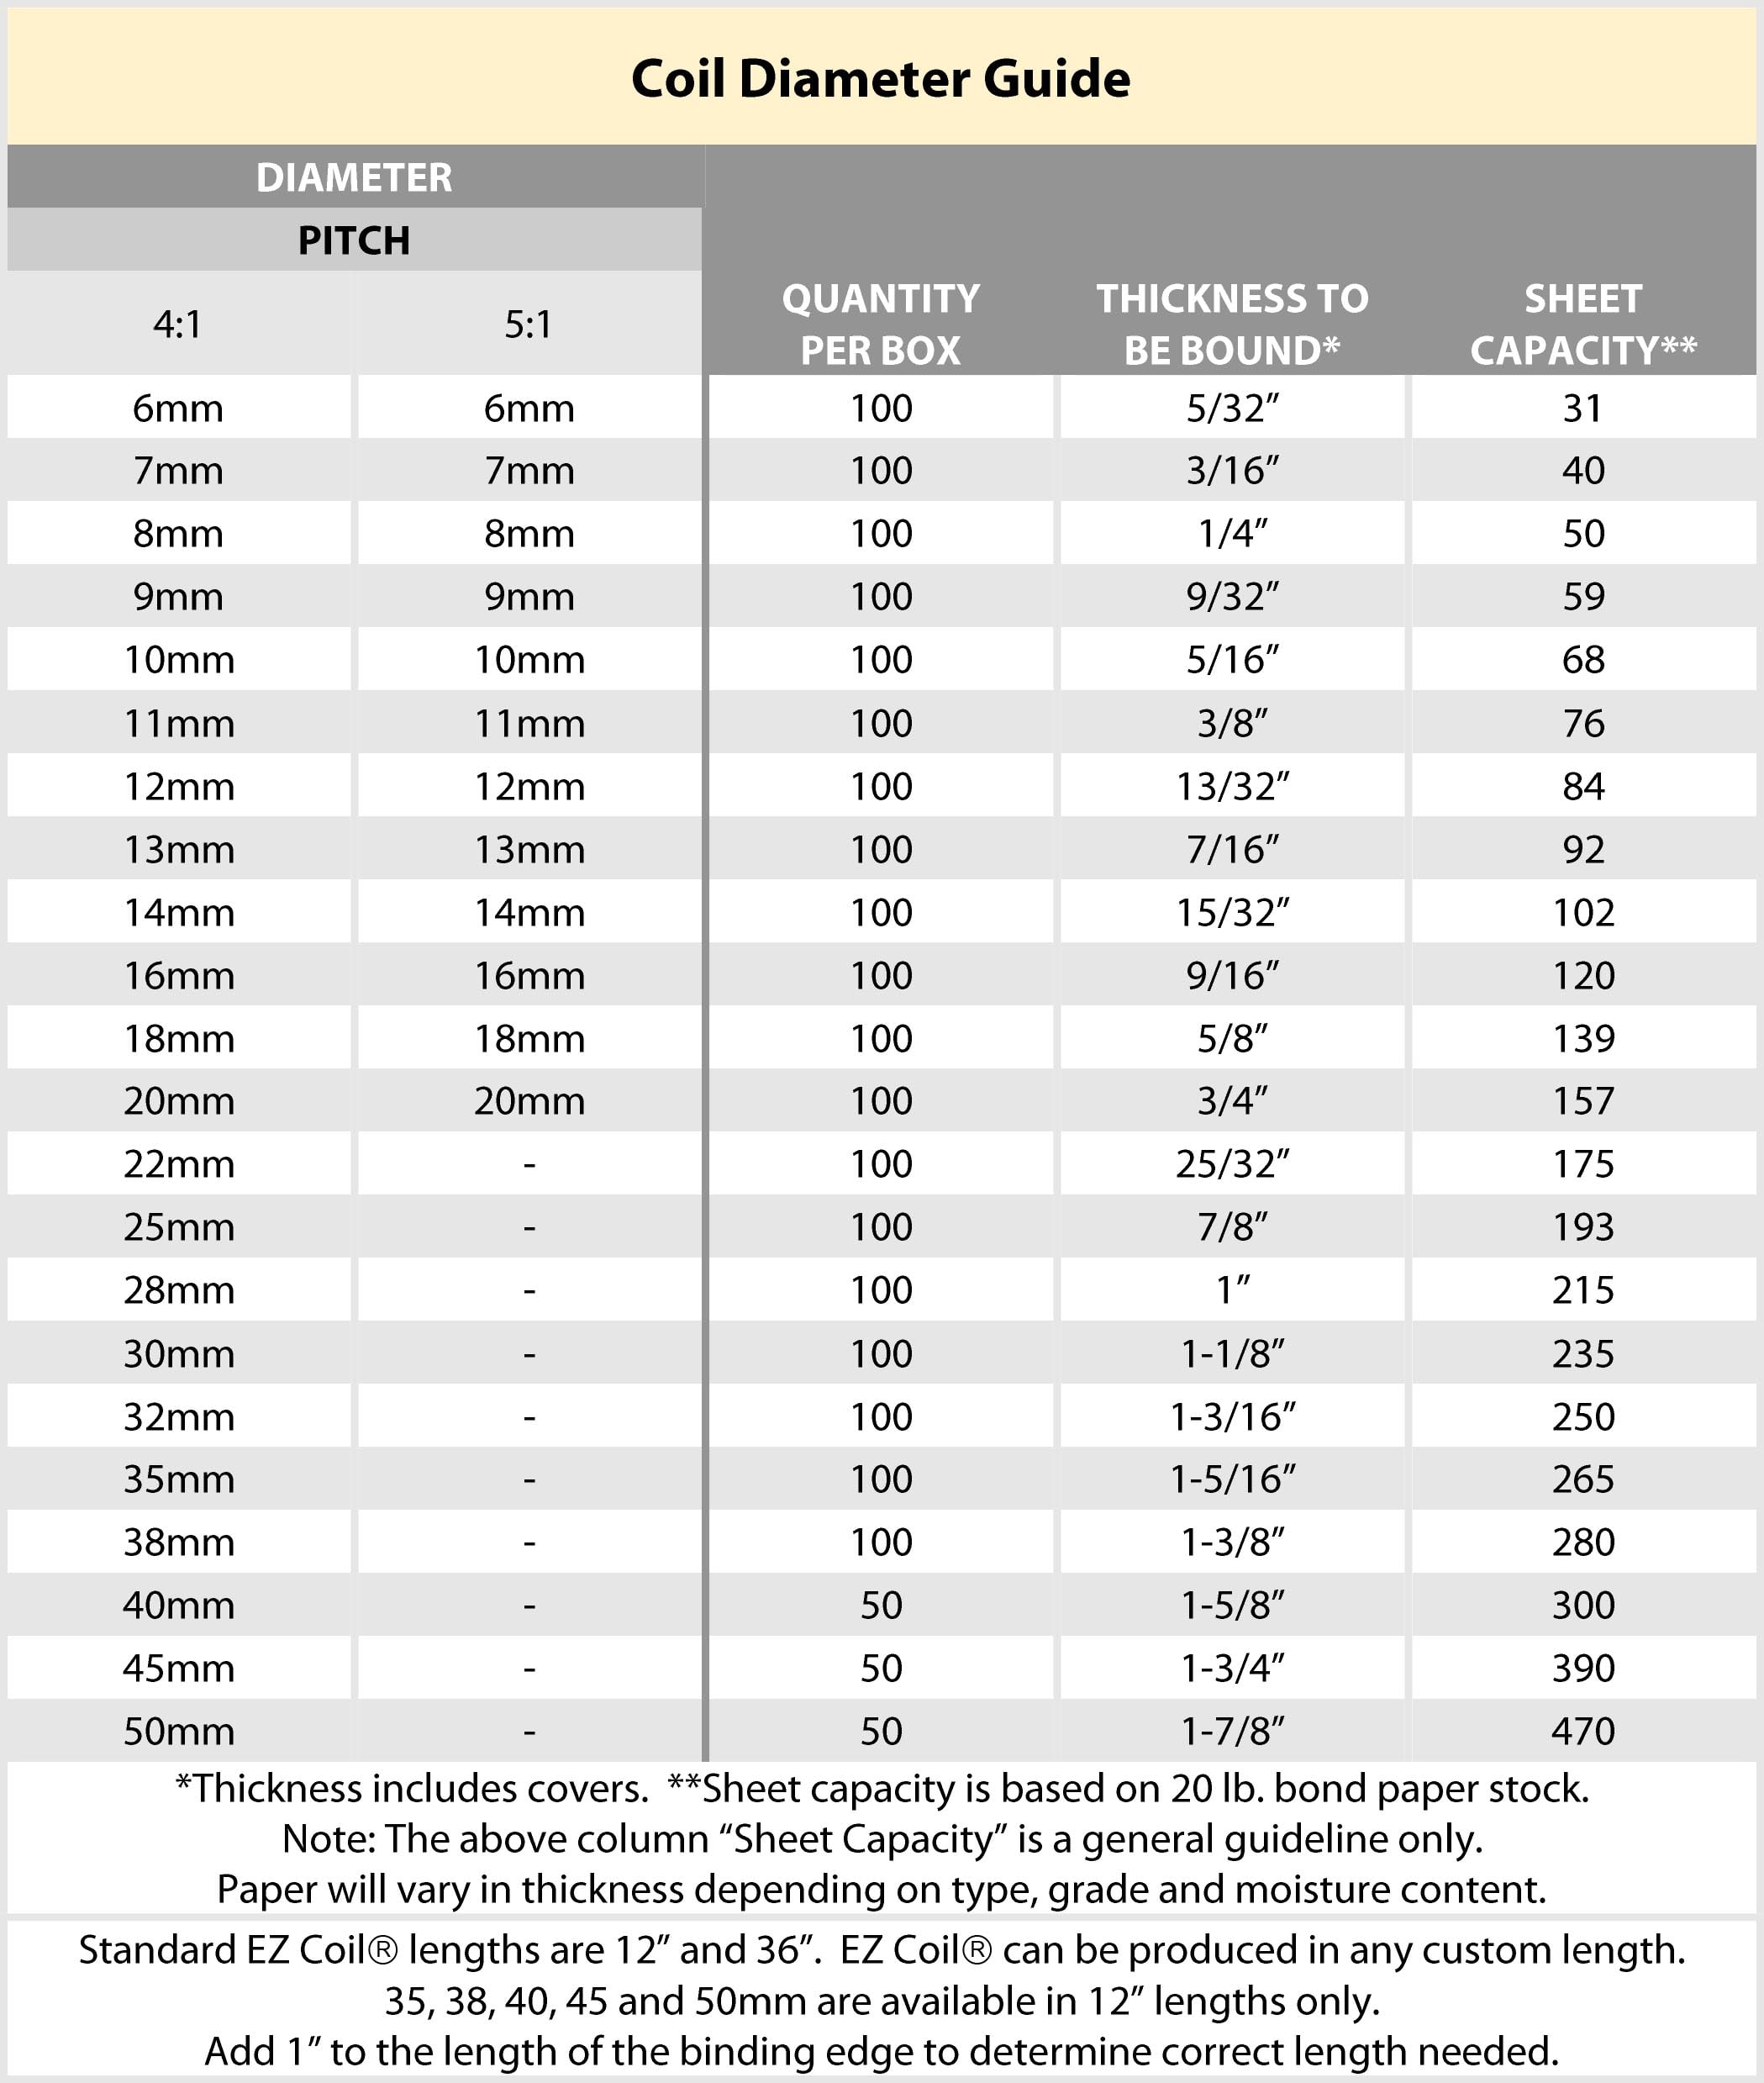
Matching coil diameter to page count ensures your book lies flat and turns smoothly.
Coil Size Guide
| Page Count | Recommended Diameter |
|---|---|
| 10–30 | 1 inch |
| 30–60 | 1.25 inches |
| 60–100 | 1.5 inches |
- A coil that’s too small won’t close properly and may damage pages
- A coil that’s too large looks bulky and holds pages poorly
Test First: Buy sample packs to test fit before committing to a full batch of coils.
Prevent Common Binding Errors
Avoid these pitfalls to achieve a clean, professional result every time.
Avoid Misaligned Holes
- Realign pages before each punch
- Use a previously punched sheet as a stencil for new stacks
- Double-check printer scaling settings when using templates
Stop Text Cutoff
- Maintain a quarter-inch margin on the spine side
- Print a test page and hold a pencil along the edge to simulate coil placement
Fix Coil Jamming
- Check for bent or crushed coils before threading
- Re-punch any misaligned holes
- Try a slightly larger diameter if the coil won’t fit
Quick Fix: Warm plastic coils with a hairdryer for 5 to 10 seconds to increase flexibility.
Upgrade Results with Templates
SVG templates streamline the design process and ensure accurate hole placement.
Find Free Templates Online
- Search “spiral bound notebook SVG” on Etsy, Pinterest, or craft sites
- Download templates and print on cardstock for durable covers
- Many templates include pre-marked hole guides
Print with Precision
- Select “Actual Size” or “100% Scale” in your printer settings
- Avoid “Fit to Page,” which distorts hole positions
- Let ink dry completely before punching to prevent smudging
Design Tip: Add titles, dividers, or themed graphics to personalize your notebook for gifts or special projects.
When to Consider a Binding Machine
Manual binding works well for most hobby projects, but machines offer advantages for frequent use.
Manual Binding Is Best For:
- Occasional projects (1 to 5 notebooks per month)
- Budget-friendly DIY crafting
- Small classrooms or home use
- Test runs before mass production
Invest in a Machine If You:
- Make more than 10 notebooks monthly
- Need consistent hole spacing every time
- Bind thick documents over 100 pages
- Want faster turnaround for clients or sales
Cost Note: Entry-level spiral binders start around $50. This investment pays off for teachers, small publishers, or craft businesses.
Troubleshoot Binding Issues Fast
Solve common problems quickly to save time and materials.
Coil Won’t Stay Closed
- Cause: Coil too large or under-tightened
- Fix: Use the correct size and twist more tightly with pliers
Pages Don’t Turn Smoothly
- Cause: Coil too tight or misaligned holes
- Fix: Loosen the twist slightly and recheck hole alignment
Holes Rip During Threading
- Cause: Paper too thick or dull punch
- Fix: Punch fewer sheets at once and sharpen or replace the punch
Prevention: Always test with a sample stack before binding your final version.
Maximize Durability and Appearance
A few finishing touches make your handmade booklet last longer and look more polished.
Use Heavy-Duty Covers
- Print covers on 110 lb cardstock or laminated paper
- This adds rigidity and protects inner pages from bending
Match Coil Color to Your Theme
- Black, white, or clear coils suit formal reports
- Bright colors work well for planners, kids’ books, or gift journals
Add Protective Finishes
- Laminate covers for water resistance
- Apply clear packing tape along the spine edge for extra strength
Pro Tip: Store finished books flat to prevent coil deformation over time.
Frequently Asked Questions About Spiral Binding Without a Machine
Can you really spiral bind a book without a machine?
Yes. You can achieve clean, professional results using a standard three-hole punch, spiral coils, and basic tools like scissors and pliers. The process works best for projects up to 100 pages.
What can I use instead of a spiral binding machine?
A three-hole punch, scissors, pliers, and pre-cut spiral coils are all you need. Optional tools include a ruler for alignment, a threading pick for stubborn holes, and fine-grit sandpaper for smoothing cut ends.
How many pages can you bind by hand?
Manual spiral binding is ideal for documents up to 100 pages. Beyond that, hole alignment becomes difficult and the coil may not close properly without machine assistance.
What size spiral coil should I use?
Match the coil diameter to your page count. Use 1 inch for 10 to 30 pages, 1.25 inches for 30 to 60 pages, and 1.5 inches for 60 to 100 pages. Testing with a sample pack helps you find the right fit.
How do you close a spiral binding coil by hand?
Twist the top and bottom ends of the coil inward toward the center until the spirals interlock. Use needle-nose pliers to compress the twisted ends gently for a tighter, more secure closure.
Where can you find spiral binding coils?
Spiral coils are available at office supply stores, craft shops, and online retailers. Many sellers offer pre-cut lengths in various colors and diameters, which makes manual threading easier.
Key Takeaways for Hand Spiral Binding Success
Learning how to spiral bind a book without a machine is a practical skill that saves money and unlocks endless creative possibilities. The process boils down to five core steps: prepare your pages, punch accurate holes, thread the coil by hand, close it tightly, and trim the excess. With practice, you can complete a single booklet in under 10 minutes.
Start with a small project like a simple notebook or mini journal. Test your coil size, refine your hole alignment, and build confidence before tackling larger projects. Once you master the basics, you’ll have a valuable skill for school, work, gifting, or even small-scale crafting ventures. Grab your supplies and bind your first book today.





