
That stack of printed pages sitting on your desk could become a polished, book-style document in under two minutes. No hole punching. No plastic combs. No messy glue. Thermal binding machines transform ordinary printouts into permanent, professional deliverables that look like they came straight from a commercial print shop.
Thermal binding uses heat-activated adhesive already built into the spine of a special cover. You slide your collated pages into the cover, place it in the machine, apply heat, and cool. The adhesive melts into the page edges, then hardens as it cools — locking everything into a flat-spine, book-like finish. The process is clean, fast, and produces results that rival traditional bookbinding.
In this guide, you will learn exactly how thermal binding machines operate, the science behind the adhesive spine, and how to choose the right cover for any project. You will also discover how to measure spine width correctly, avoid common binding mistakes, and troubleshoot issues like loose pages or wrinkled spines.
The Core Binding Mechanism Explained
Heat Activates Pre-Loaded Adhesive
Thermal binding works on a beautifully simple principle. The cover you use has thermoplastic adhesive already embedded in its spine. When the machine heats that spine, the adhesive melts, flows into the page edges, and forms a mechanical bond with the paper fibers. As the document cools, the adhesive re-hardens — permanently locking pages to the cover.
The heating elements inside a thermal binding machine reach approximately 120 to 150°C (250 to 300°F). This temperature is hot enough to melt the adhesive without scorching paper or warping the cover. Depending on document thickness, the heating cycle lasts between 20 and 90 seconds.
No Punching or Assembly Required
Unlike comb or coil binding, thermal binding requires zero hole punching. There are no combs to thread, no coils to spin, and no alignment headaches. You simply collate your pages, slide them into the cover, and run the cycle.
This makes thermal binding one of the fastest finishing methods for medium to high page-count documents. Offices that produce client proposals, legal filings, or annual reports rely on thermal binding to deliver professional results without outsourcing to a print shop.
The Step-by-Step Binding Process
Prepare and Insert Pages Correctly
Proper preparation is the foundation of a clean bind. Start by collating all pages in the correct order and tapping the stack firmly on a flat surface. Align both the short edges and the long edges until the stack is perfectly even. Misaligned pages create crooked spines and weak bonds.
Next, select a thermal binding cover with the correct spine width for your document. Open the cover and slide the page stack inside, spine edge first. Press the stack firmly into the spine groove. The pages should sit flush against the inner spine — any gap will prevent full adhesive contact.
Pro Tip: Always test-fit the stack before binding. The spine should snugly wrap the compressed edge without strain or excess room.
Run the Heating Cycle
With the cover loaded, place it spine-down into the machine’s binding slot. Most models feature a guide indicating proper insertion depth. Close the lid if your machine has one and start the cycle.
During heating, the machine applies controlled temperature to the spine only. The adhesive softens and flows upward into the paper edge, creating a deep, uniform bond. Do not open the lid or remove the document early. Interrupting the cycle leads to partial adhesion and a weak bind.
Cool the Document Flat
Immediately after the heating cycle ends, remove the document and place it spine-down on a flat, cool surface. A dedicated cooling tray works best, but a clean desktop will do. Place something flat and heavy on top to keep pages compressed as the adhesive sets.
Cooling time varies by thickness:
– Thin documents (up to 40 pages): 30 to 60 seconds
– Medium documents (40 to 150 pages): 60 to 90 seconds
– Thick documents (150 to 300 pages): 90 to 120 seconds
– Very thick documents (300+ pages): 120 seconds or more
Opening or flexing the document too soon can break the forming bond. Wait at least 60 seconds before handling.
Selecting the Right Spine Width
Measure the Compressed Page Stack
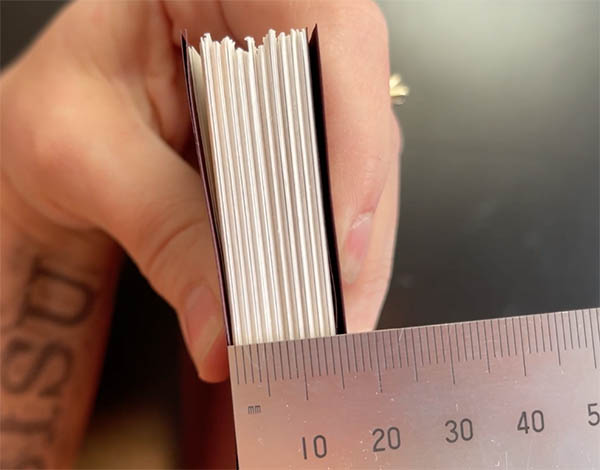
Choosing the correct spine width is the single most important technical step in thermal binding. A spine that is too narrow will not close properly and may crack. A spine that is too wide will wrinkle and leave pages loose inside the cover.
To measure correctly:
1. Compress your page stack firmly between two fingers
2. Measure the thickness with a ruler or caliper
3. Add 1 to 2mm to account for the cover material
4. Select the closest spine width — when between sizes, go wider
Most manufacturers provide page count charts, but actual measurement is always more accurate than relying on page numbers alone.
Avoid These Common Spine Width Errors
- Spine too narrow: Cracks, prevents full opening, adds stress to pages
- Spine too wide: Results in a wrinkled spine, poor glue contact, and shifting pages
A properly sized spine should snugly wrap the compressed edge of the page stack without strain or excess material.
Cover Types and Their Best Uses

Soft vs. Hard Cover Options
Thermal binding covers fall into two main categories, each suited to different applications.
Soft Covers:
– Made of thick cardstock or textured paper
– Resemble paperback books
– Available in solid colors and patterns
– Ideal for internal reports, proposals, and everyday use
Hard Covers:
– Rigid, book-quality construction
– Mimic hardback books
– Offer superior durability and prestige
– Best for client deliverables, presentations, and archival documents
Specialized Professional Covers
For high-impact documents, consider these premium options:
Window (Crystal) Covers:
– Clear front panel shows off a custom-designed cover page inside
– Eliminates the need for direct printing on the cover
– Great for branded reports and proposals
Linen and Leatherette Covers:
– Simulate fabric or leather textures
– Convey formality and permanence
– Commonly used for board reports, legal submissions, and executive presentations
These covers cost more but significantly elevate perceived value.
Machine Operation and Essential Features
Warm-Up Time and Cycle Control
Thermal binding machines vary in warm-up requirements. Some models need 5 to 8 minutes before the first bind, while others start instantly. For occasional use, instant-start machines offer more convenience. For high-volume environments, fast warm-up and short cycle times improve productivity.
Most machines include:
– Temperature dial or digital display
– Timer or auto-cycle function
– Cooling tray
Higher-end models may feature multiple binding slots, allowing continuous production without waiting between cycles.
Why the Cooling Tray Matters
Never skip the cooling step. The cooling tray ensures even pressure and flatness as the adhesive solidifies. Without it, pages can shift, resulting in a crooked bind or weak bond. Always place the document spine-down on the tray and avoid stacking freshly bound documents until fully cooled.
Troubleshooting Common Binding Problems
Fix Loose or Falling-Out Pages
If pages pull out after binding, the issue usually stems from one of three causes:
1. Pages were not pressed fully into the spine groove
2. Spine width was too large for the page count
3. Adhesive did not penetrate thin stacks
Solution: Ensure full insertion, match spine width to compressed thickness, and consider pre-warming thick documents before the full cycle.
Eliminate Wrinkled or Misshapen Spines
A wrinkled spine means the cover was too wide. Excess material folds as the glue sets, creating an unprofessional appearance.
Fix: Use a narrower spine width. The spine should be only slightly wider than the compressed page stack.
Improve Document Flexibility
Newly bound documents often feel stiff and will not open flat. This is normal and resolves with use.
To loosen:
– Gently fan the pages back and forth
– Flex the spine gently several times
– Allow light use over a day or two
If the document still will not open past 90 degrees, the spine was likely too narrow.
Pro Techniques for Professional Results
Pre-Warm Thick Documents
For documents over 150 pages, pre-warming the loaded cover for 5 to 10 seconds at half the normal cycle time dramatically improves adhesion. This softens the adhesive slightly before full compression, allowing it to flow deeper into the page stack. Without pre-warming, only the outer layers of paper may bond properly, leaving inner pages vulnerable.
Match the Method to the Document
Thermal binding is ideal for:
– Client proposals left behind after meetings
– Legal and court submissions
– Annual reports
– Academic theses
– Executive presentations
Because the bind is permanent, it is not suitable for documents that need updates. But for anything meant to be read cover-to-cover and kept, it is unmatched in professionalism.
Comparing Binding Methods
Why Choose Thermal Over Comb or Coil?
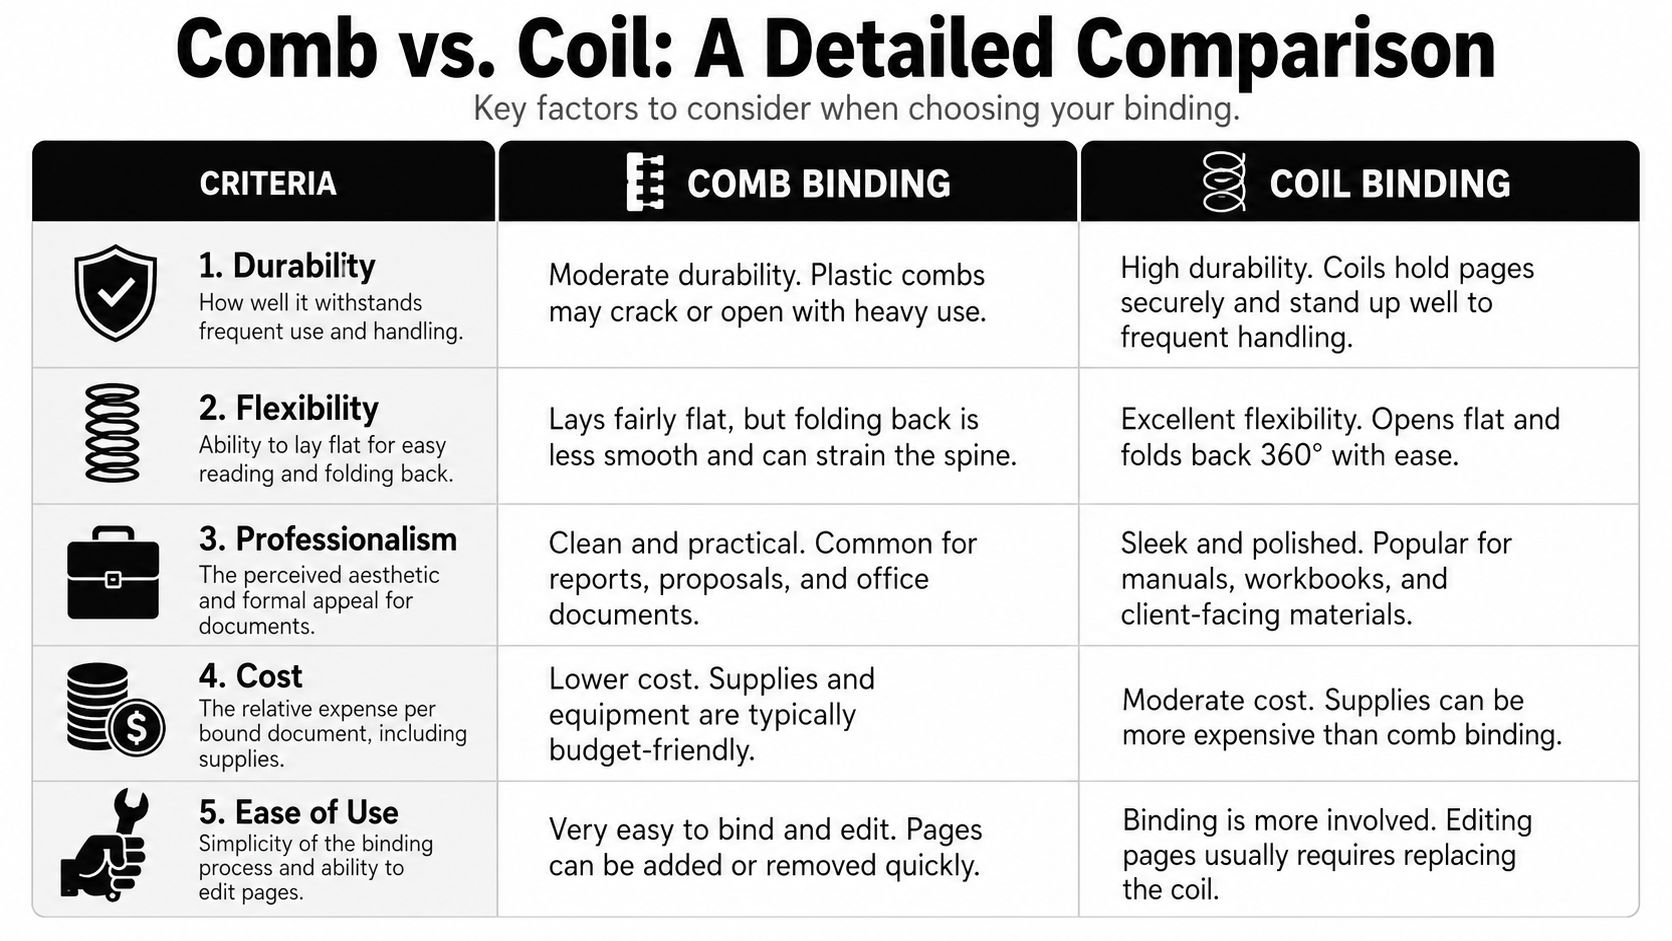
| Feature | Thermal Binding | Comb/Coil Binding |
|---|---|---|
| Speed | Fast, no punching | Slower, requires hole-punching |
| Appearance | Clean, book-like spine | Visible spine hardware |
| Editability | Permanent | Pages can be added or removed |
| Best for | Final deliverables | Drafts, workbooks, manuals |
Thermal binding wins on speed and aesthetics for final versions. Comb or coil is better for editable or frequently updated documents.
How Thermal Differs From Perfect Binding
Both methods produce book-like results. However, perfect binding (used in commercial printing) applies hot glue separately as a strip. Thermal binding integrates adhesive into the cover itself, making it faster and simpler for in-house, on-demand production.
Maintenance and Longevity
Clean the Binding Slot Regularly
Over time, adhesive residue can build up in the heating slot, especially if covers are overfilled or misaligned. This reduces heat transfer and can contaminate future binds.
Clean the slot monthly with a soft cloth slightly dampened with isopropyl alcohol. Never use water or abrasive cleaners.
Store Covers Properly
Keep thermal binding covers in a cool, dry place away from direct sunlight. Heat or humidity can prematurely soften the adhesive, leading to messy binds.
Frequently Asked Questions About Thermal Binding
How Do I Know Which Spine Width to Use?
Compress the page stack firmly between two fingers and measure the thickness with a ruler. Add 1 to 2mm to allow for the cover material. Select the spine width that most closely matches this measurement. When between two sizes, choose the wider one.
Can I Re-Bind a Document If I Made a Mistake?
Not reliably. Once the adhesive has set, it cannot be re-melted cleanly. If a page is out of order, the document must be reprinted. This is why careful collation before binding is critical.
How Many Documents Can I Bind Per Hour?
With a standard machine and medium-thickness documents, approximately 30 to 40 documents per hour in a continuous workflow. Machines with multiple binding slots increase throughput significantly.
What Is the Maximum Page Count for Thermal Binding?
Most thermal binding systems handle up to 400 to 500 pages. Very thick documents over 300 pages require high-quality machines with longer heating cycles and adequate adhesive in the spine to penetrate the full page stack depth.
Is Thermal Binding the Same as GBC ThermaBind?
GBC ThermaBind is one of the most well-known thermal binding systems, but it is not the only one. Thermal binding is a generic term for any heat-activated adhesive spine binding. Multiple manufacturers produce compatible covers and machines.
Is Thermal Binding Accepted for Court Filings?
Thermal binding is accepted by many courts and government agencies for document submissions. Check the specific filing rules for your jurisdiction before submitting. Its flat, professional spine generally meets presentation requirements for legal submissions.
Key Takeaways for Mastering Thermal Binding
Thermal binding machines deliver a fast, clean, and professional way to finish documents — transforming ordinary printouts into polished, book-quality reports in under two minutes. By understanding how heat activates the spine adhesive, selecting the right cover, and following proper cooling procedures, you can consistently produce high-impact documents that reflect well on your work.
The three habits that separate amateur results from professional ones: measure your spine width carefully, align your pages before every bind, and never skip the cool-down. Master these fundamentals and every document you bind will look like it belongs on a boardroom shelf. Ready to get started? Pull that stack of pages off your desk, grab a cover, and run your first bind today.





