

You’ve just finished a report, proposal, or thesis and want it to look polished and professional. A thermal binding machine can transform your loose pages into a sleek, book-like document in under two minutes, with no punching or screws required, just clean, permanent binding. But if you’ve never used one, the process can seem intimidating at first. The key to success lies in preparation: choosing the right cover, aligning your pages perfectly, and allowing proper cooling time.
This guide walks you step by step through how to use a thermal binding machine effectively, avoiding common mistakes that lead to loose pages, wrinkled spines, or failed binds. Whether you’re preparing client deliverables, academic theses, or internal reports, mastering thermal binding ensures your work makes a lasting impression. You’ll learn how to prep your document, select the correct spine width, run the binding cycle, and cool properly for a flawless finish.
Prepare Your Document Correctly
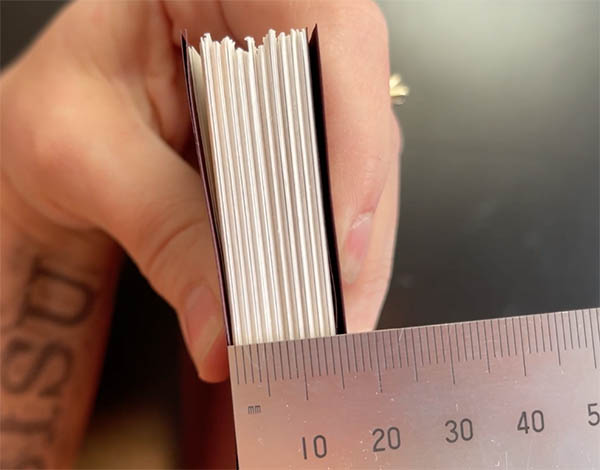
Before you even turn on the machine, your document must be ready for binding. Thermal binding is permanent, so once the adhesive sets, you cannot remove or add pages. That makes pre-binding preparation critical.
Align Pages Perfectly
Start with a collated stack of pages in the correct order. Tap the stack firmly on a flat surface from both short and long edges to align all sheets. Misaligned pages create uneven spines and poor adhesion. Use a paper jogger if available, or simply press the edges together by hand.
Verify Page Count and Thickness
Compress the page stack between your fingers and measure its thickness with a ruler. This determines the correct spine width. Most covers support 20 to 500 pages, depending on paper weight. Use manufacturer charts as a guide, but always confirm by measuring your actual stack.
Check for Tabs or Inserts
If your document includes tabbed dividers or thicker inserts, confirm they fit within the spine width. Tabs extending beyond the edge may prevent the cover from closing fully. Trim them flush with the page edge or choose a wider spine to accommodate them.
Choose the Right Thermal Binding Cover
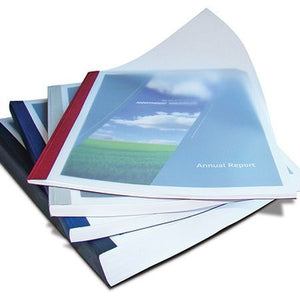
Selecting the proper cover is essential for a strong, professional bind. Covers come in soft and hard styles, with varying spine widths and colors to suit different needs.
Soft vs Hard Covers
Soft covers are flexible and economical, making them ideal for internal reports or short-term use. Hard covers offer durability and a premium look, perfect for client proposals, annual reviews, or academic submissions. Both types use heat-activated adhesive built into the spine.
Match Spine Width to Page Stack
Use a spine width slightly wider than your compressed page stack. If the spine is too narrow, the cover strains and the document won’t open smoothly. If too wide, excess material wrinkles during cooling and adhesion weakens. When in doubt, go one size up.
Insert Pages Into the Cover
Now that your cover and pages are ready, it’s time to assemble them before placing them in the machine.
Slide Pages Spine-First
Open the thermal binding cover and insert the page stack spine-edge first. Push the stack all the way into the spine channel until it meets resistance. This ensures full contact with the adhesive.
Center the Page Stack
Position the pages so margins are even on both sides. Off-center pages look unprofessional and may cause binding failure. Visually check that the top, bottom, and outer edges align with the cover.
Load the Machine and Start Binding
With the cover loaded, place it into the thermal binding machine correctly to begin the heating process.
Place Spine Down in Slot
Insert the cover into the machine’s binding slot with the spine facing down. The heating element targets only the spine area, so correct orientation is crucial. Make sure the cover is fully seated in the slot.
Run the Heating Cycle
Most machines auto-detect thickness and set cycle time, typically 20 to 90 seconds. For manual models, refer to the timing chart:
| Page Count | Cycle Time |
|---|---|
| Up to 40 | 20 to 30 sec |
| 40 to 150 | 45 to 60 sec |
| 150 to 300 | 60 to 90 sec |
| 300+ | 90+ sec |
Do not remove the document early, even if the machine beeps. Wait for the full cycle to complete.
Apply Heat Evenly for Thick Documents
For stacks over 150 pages, standard heating may not penetrate fully, leading to weak adhesion at the core.
Pre-Warm the Cover
Before the full cycle, insert the loaded cover for 5 to 10 seconds at half the normal time. This softens the adhesive slightly, allowing it to flow more evenly when the full heat is applied. Then run the complete cycle.
Ensure Full Adhesive Saturation
Thick documents require adequate heat and time for the adhesive to reach all pages. High-quality machines with consistent heating elements deliver better results. Avoid rushing the process.
Cool the Document Properly
Cooling is just as important as heating. The adhesive must re-harden under pressure to lock pages in place permanently.
Place Spine Down on Flat Surface
Immediately after the cycle, remove the document and place it spine down on a cooling tray or flat desk. Never lay it cover-up, as this risks warping the spine.
Apply Weight While Cooling
Place a heavy, flat object like a book or metal plate on top. This keeps pages compressed and spine flat as the glue sets. Do not open or flex the document during this time.
Wait at Least 60 Seconds
Let it cool undisturbed:
- Thin documents: 30 to 60 sec
- Medium: 60 to 90 sec
- Thick: 90 to 120 sec
- Very thick: 2+ minutes
Premature handling causes pages to shift or detach from the spine.
Inspect and Test the Bind
Once cooled, check your work to ensure a successful bind before delivering the document.
Open Gently and Fan Pages
Slowly open the document from both ends. Pages should stay firmly attached. If any feel loose, the stack wasn’t pressed fully into the spine or the cover was too wide.
Condition Stiff Spines
If the document resists opening past 90 degrees, gently flex it back and forth. This conditions the adhesive. For future jobs, verify spine width isn’t too narrow.
Look for Wrinkles or Gaps
A wrinkled spine usually means the cover was too wide. A gap between pages and spine indicates incomplete insertion. Both affect durability and appearance.
Troubleshoot Common Binding Issues
Even with care, problems can occur. Here’s how to diagnose and prevent them.
Pages Falling Out After Binding
Cause: Pages not pressed into spine groove or spine too wide.
Fix: Before binding, test-fit the stack. The spine should hug the edge snugly. Press firmly into the channel.
Wrinkled or Bulging Spine
Cause: Excess spine material folds during cooling.
Fix: Choose a narrower cover. Measure compressed thickness and select the closest match.
Document Won’t Open Flat
Cause: Spine too narrow or insufficient conditioning.
Fix: Flex gently after cooling. For rebinds, choose a wider spine next time.
Optimize Workflow for Multiple Binds
If you’re binding several documents, efficiency matters.
Batch Prepare Pages
Collate, align, and verify all stacks before starting. Set up covers in order. This reduces downtime between cycles.
Use Multi-Slot Machines
High-volume environments benefit from machines with dual or triple binding slots. While one document cools, another heats, effectively doubling output.
Expect 30 to 40 Binds Per Hour
With 60 to 90 second cycles including cooling, a single machine handles about 35 documents per hour. Pre-warming and cooling trays help maintain pace.
Maintain Your Thermal Binding Machine
Regular care ensures consistent performance and extends machine life.
Clean the Binding Slot Weekly
Wipe out melted adhesive residue with a cotton swab or soft cloth. Buildup can interfere with heat transfer and alignment.
Avoid Overheating
Let the machine cool periodically during long sessions. Continuous use without breaks stresses internal components.
Store Covers Flat
Keep unused covers in a dry, cool place. Heat or moisture can prematurely activate adhesive before you’re ready to use them.
Frequently Asked Questions About Thermal Binding
How do I know which spine width to use?
Compress your page stack firmly between two fingers and measure the thickness with a ruler. Add 1 to 2mm to allow for the cover itself. Select the spine width size that most closely matches this measurement. When between two sizes, choose the wider one.
Can I re-bind a thermal binding document if I made an error?
Not reliably. Once the adhesive has set, it cannot be re-melted cleanly. If a page is out of order, the document must be reprinted. This is why careful collation before binding is critical.
How many documents can I bind per hour with thermal binding?
With a standard machine and medium-thickness documents, allowing 60 to 90 seconds per cycle plus cooling, you can bind approximately 30 to 40 documents per hour in a continuous workflow. Machines with multiple binding slots increase throughput significantly.
What is the maximum page count for thermal binding?
Most thermal binding systems handle up to 400 to 500 pages. Very thick documents over 300 pages require high-quality machines with longer heating cycles and adequate adhesive to penetrate the full page stack depth.
Can I thermal bind documents with tabs or dividers?
Yes, but tabs that extend beyond the page edge may interfere with the cover closing. Trim tabs to the page edge before binding, or select a cover that accommodates the extended dimension.
Final Tips for Professional Thermal Binding Results
Thermal binding turns ordinary documents into impressive, shelf-ready deliverables. To get the best results every time, always proof your document before binding since errors mean reprinting and rebinding. Use hard covers for client-facing work to project quality and permanence. Never rush cooling, as it is the final critical step in adhesion. Label spines clearly using printed or adhesive labels, and match cover color to purpose, such as black for formal reports and colored covers for internal use.
With practice, the entire thermal binding process takes less than two minutes per job, making it one of the most efficient binding methods available. By following these preparation, heating, and cooling steps consistently, you’ll produce durable, polished documents that reflect professionalism and attention to detail.





