
If your Infoguard shredder suddenly stops working, jams frequently, or behaves erratically, you are not alone. These high-performance machines are built for security and durability, but even the best models can encounter issues like power failure, paper jams, or sensor errors. The good news is most problems have simple, user-fixable solutions. Whether your unit will not power on, runs constantly in auto mode, or only shreds the bottom of sheets, this guide delivers step-by-step troubleshooting fixes based on real mechanical behavior and manufacturer insights. You will learn how to diagnose symptoms fast, avoid common mistakes, and keep your Infoguard shredder running smoothly.
Power Not Turning On? Check These First
When your Infoguard shredder shows no signs of life, start with the basics before assuming internal failure.
Verify Outlet and Cord Connection
Ensure the power cord is fully inserted into both the shredder and a working wall outlet. Test the outlet with another device to confirm it is live. Inspect the cord for visible damage like fraying, kinks, or chew marks. If damage is present, discontinue use and replace the cord. For models with detachable cords, ensure the connection at the base is secure.
Allow Thermal Cutout to Reset
If the shredder was running for an extended period, the thermal protection may have triggered. Do not unplug the unit. Leave the power switch in the On position so the internal cooling fan can operate. Wait 30 to 45 minutes for the motor to cool down. Once reset, the shredder will restart automatically. If you unplugged it during overheating, wait 30 seconds after plugging it back in before pressing start.
Confirm Bin and Cover Are Properly Seated
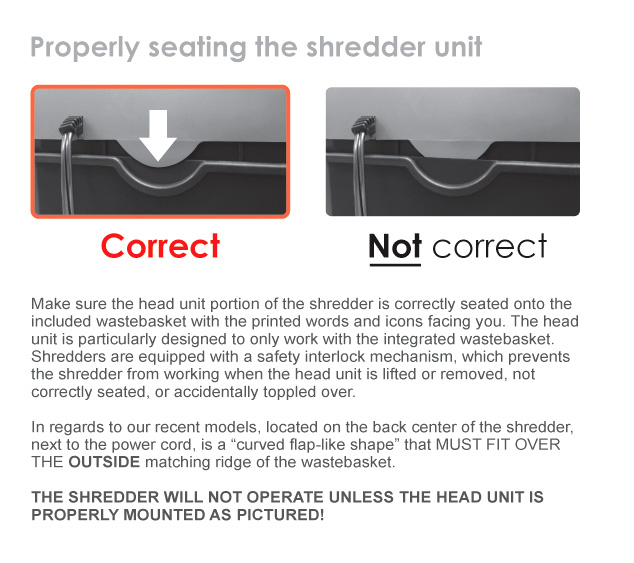
Infoguard shredders use safety interlocks that disable operation if components are not aligned. Push the wastebasket fully into place until it clicks. Ensure alignment tabs on the bin located at back center, left, or right fit into slots under the head unit. Check that the ShredSafe cover is not tilted open beyond its first detent position. Close it gently to the normal operating angle. If a plastic bag lines the bin, remove it temporarily because bags can prevent full seating or block sensors.
Fix Auto-Sensor Issues in Seconds
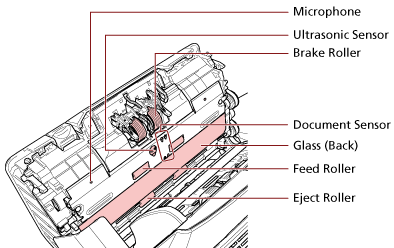
The auto-feed sensor is sensitive and prone to false triggers or failures.
Clean a Dirty Activation Sensor
In Auto mode, the shredder activates only when paper hits the center sensor in the feed slot. If the machine does not start or runs nonstop without paper, the sensor is likely blocked. To clean, turn off and unplug the shredder. Use a dry cotton swab to gently wipe dust, oil, or paper fibers from the sensor area. Do not use canned air because it can push debris deeper or damage optical components.
Clear Physical Blockages with Cardstock
If cleaning does not help, a small paper fragment may be pressing against the sensor switch. Insert a rigid index card, file folder, or cereal box cardboard into the center of the feed slot. Push down firmly while switching to Reverse or Auto mode. This often dislodges hidden obstructions.
Test Proper Paper Feeding Technique
Narrow sheets or off-center feeding may miss the trigger zone. Always insert paper straight into the middle of the slot. The motor briefly runs when switching to Auto. This is calibration. Continuous running indicates a sensor fault, not normal operation.
Clear Paper Jams Like a Pro
Jams are the most common issue and often the easiest to fix with the right method.
Reverse Then Alternate Feed Direction
At the first sign of resistance, switch to Reverse and run for 3 to 5 seconds. If not cleared, alternate. Run forward for 1 second, then reverse for 5 seconds. Repeat until paper loosens. Never force-feed during a jam because this increases strain and risks gear damage.
Extract Stubborn Paper Safely
For visible paper ends, unplug the shredder first. Use needle-nose pliers or tweezers to pull out fragments from the entry and exit sides. For deep jams, carefully cut paper clumps with blunt-tip scissors, avoiding contact with blades.
Force Through with Rigid Cardstock
If paper remains stuck, insert a thick sheet like a file folder or greeting card into the center of the feed slot. Apply strong downward pressure while running in Reverse or Auto. The stiffness helps push jammed material through blade resistance.
Use Oil for Severe, Fused Jams
When paper is glued to blades by friction and heat, unplug the unit first. Drizzle 2 to 3 tablespoons of shredder oil directly onto the jam site. Do not use WD-40 or vegetable oil. Let it soak for 30 minutes to soften fibers. Plug in, switch to Auto, and attempt to run. Reinforce with rigid cardstock if needed. After clearing, run several oiled sheets through to restore lubrication.
Special Care for Infoguard NX85B Model
The NX85B is prone to jams from overfilled bags and undercarriage buildup. Empty the bin at three-quarters full to prevent misalignment. After jam clearance, inspect blades and clean with a soft brush. Re-lubricate immediately to reduce recurrence risk.
Motor Runs But No Shredding? Diagnose Now
A humming motor with no blade movement signals a mechanical or safety disconnect.
Confirm Bin Is Fully Inserted
Even a slight gap disables the cutting mechanism via interlock. Remove and firmly reinsert the bin until it clicks. Check for plastic bags or shreds blocking full seating.
Listen for Stripped Gears
A high-pitched spooling sound means the motor spins but gears are not engaging. This is usually caused by overloading beyond sheet capacity or shredding staples, clips, or thick materials. Gear damage is irreversible without replacement. If you hear this noise consistently, contact support because repair or replacement may be necessary.
Check Cover and Door Switches
If the ShredSafe cover is open too far or the head unit is lifted, the safety switch cuts power to blades. Ensure the cover is in the correct position and the head is flush with the bin.
Fix Partial or Sluggish Shredding
When performance drops, the cause is usually preventable.
Shreds Only Bottom of Sheets
This typically means the unit is accidentally set to Reverse mode. There may be a partial jam in the upper feed path. Or paper is fed off-center. Solution. Switch to Auto or On, clear any jam using reverse cycles, and feed paper into the center of the slot.
Slow Start or Weak Pull-In Power
Two likely causes exist. The blades may need lubrication or the rollers are worn.
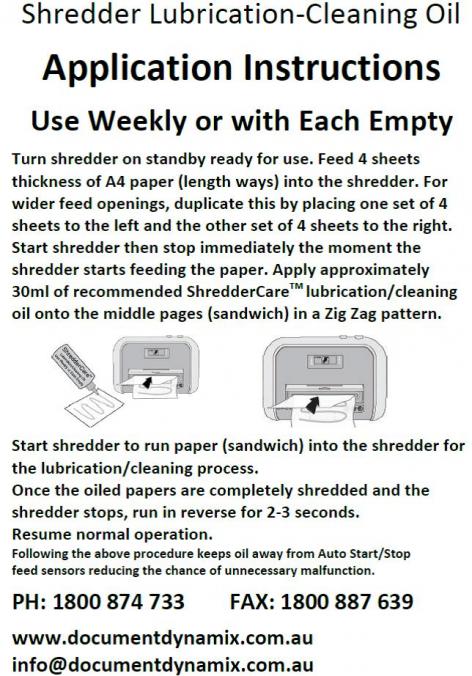
Lubricate for Smooth Operation. Apply shredder oil in a zigzag pattern on a sheet of paper. Run through in reverse for 5 seconds to distribute oil. Frequency is every 15 to 20 minutes for micro-cut, 30 minutes for cross-cut, or per half-bin for strip-cut.
Clean or Replace Auto-Feed Rollers. If documents are not picked up, wipe rollers with a lightly damp cloth. Let dry completely before testing. If rollers are cracked or glazed, order replacements. Avoid using oils or sprays on rollers because they degrade rubber over time.
Stop Overheating Before It Happens
Overheating shuts down the motor as a safety measure, but it is avoidable.
Recognize the Signs
Watch for sudden shutdown mid-shred. A burning smell indicates heat from motor or paper friction. The thermal light may be activated.
Cool Down Correctly
Leave the power on after shutdown if your model has a cooling fan. Wait 30 to 45 minutes before resuming. If unplugged, wait 30 seconds after replugging before restarting.
Prevent Future Shutdowns
Follow the 15-minute run and 30-minute cool rule for heavy use. Place the shredder in a well-ventilated area. Do not tuck it against walls. Lubricate regularly to reduce friction and heat.
Maintain Your Shredder to Prevent Problems
Routine care prevents 90 percent of issues.
Follow the Lubrication Schedule
Usage level determines how often you should lubricate.
- Light use under 10 sheets per day: once a month using zigzag oil on paper
- Medium use 10 to 20 sheets per day: every two weeks using the same method
- Heavy use over 20 sheets per day: every 15 to 20 minutes of use
Never use vegetable oil because it goes rancid. Never use WD-40 because it is not a lubricant. Never use spray oils because they can damage seals.
Clean Blades and Sensors Regularly
Every two weeks, use canned air to blow dust from blade grooves and feed area. Avoid spraying air directly on the sensor. Use a cotton swab instead. Monthly, vacuum fine paper dust from bin compartment and undercarriage.
Manage the Waste Bin Smartly
Empty when three-quarters full or when the Bin Full light appears. Ensure no stray shreds block bin reinsertion. If using bags, choose thin, flexible ones that do not interfere with seating.
Know What NOT to Shred
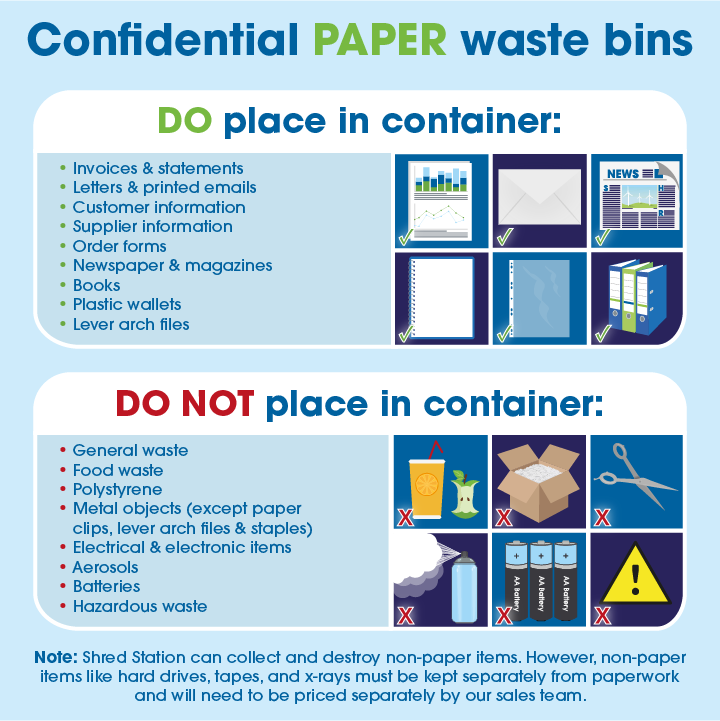
Feeding wrong materials causes most serious failures.
Never Insert These Items
- Metal fasteners like staples, binder clips, and large paper clips
- Adhesives such as labels, stickers, and windowed envelopes
- Thin paper like newsprint and tissue
- Plastics including laminated sheets and transparencies unless model has CD slot
- Bulk items like cardboard, fabric, and paper rolls
Credit Cards and CDs: Only If Designed
Only shred these in models with a dedicated slot or clear labeling. Never use Reverse while processing hard items because it can jam or damage gears.
Read Diagnostic Clues Correctly
Your shredder tells you what is wrong. Listen closely.
Listen to the Sounds
High-pitched whine indicates stripped gears. Stop use immediately. Grinding noise means metal is in the blades. Reverse out or call service. Humming with no cut indicates interlock issue or gear failure.
Watch the Lights
Green Ready light means normal standby in Auto. Bin Full light on with an empty bin means sensor blocked or bin misaligned. Clean and reseat. No light at all means check power, thermal reset, and interlocks.
Handle Error Codes Wisely
Unlisted codes on digital displays indicate internal faults. Do not attempt repair. Contact Infoguard support with the exact code for guidance.
Prevent Problems with Smart Habits
Avoid future issues with these expert-backed practices.
Adjust for Paper Type
Humid or recycled paper increases friction. Reduce feed volume by 30 percent. Fan stacks before feeding to separate sheets.
Track Usage with a Shredding Log
Record daily run time, oil applications, and jam frequency. Rising jams despite regular oiling indicate you should shorten oil intervals or inspect blades.
When to Call a Pro
Seek professional help if gears are stripped. You will hear high-pitch spooling. Seek help if grinding persists after reverse attempts. Seek help if unlisted error codes appear. Seek help for electrical issues like sparks or burning smell beyond overheating. Blades rarely need replacement because millions of cuts are typical. Poor shredding after lubrication likely means alignment issues, not wear.
Frequently Asked Questions About Infoguard Shredder Troubleshooting
Why does my Infoguard shredder not turn on at all?
Check the power cord connection first. Ensure it is plugged into a working outlet. If the shredder was running continuously, the thermal cutout may have triggered. Leave the power on and wait 30 to 45 minutes for cooling. Also verify the waste bin is fully seated and the ShredSafe cover is closed properly.
How do I fix a paper jam in my Infoguard shredder?
Start by switching to Reverse mode and running for 3 to 5 seconds. If that does not work, alternate between forward and reverse in short bursts. For stubborn jams, unplug the unit and use pliers to remove visible paper. You can also insert rigid cardstock to force the jam through. Apply oil for severe fused jams and let it soak for 30 minutes before trying again.
Why does my shredder run constantly in Auto mode without paper?
This indicates the activation sensor is blocked. Clean the center sensor in the feed slot using a dry cotton swab. Dust, oil residue, or a small paper fragment can trigger false activation. Avoid using canned air on the sensor because it may push debris deeper.
What causes the motor to run but not shred?
This usually means the safety interlock is engaged. The waste bin may not be fully seated. Push the bin firmly until it clicks. If the bin is secure, listen for a high-pitched spooling sound, which indicates stripped gears from overloading or shredding prohibited materials.
How often should I lubricate my Infoguard shredder?
Frequency depends on usage. Light use under 10 sheets daily needs monthly oiling. Medium use 10 to 20 sheets needs oiling every two weeks. Heavy use over 20 sheets needs oiling every 15 to 20 minutes. Use only manufacturer-approved shredder oil applied in a zigzag pattern on paper.
Can I shred credit cards and CDs in my Infoguard shredder?
Only if your specific model has a dedicated slot or explicit labeling for these items. Never attempt to shred these materials in a slot not designed for them. Never use Reverse mode while processing hard items because it can cause jams or gear damage.
Key Takeaways for Infoguard Shredder Troubleshooting
Most Infoguard shredder problems are quick fixes involving power resets, sensor cleaning, or simple jam removal. Understanding safety interlocks, sensor behavior, and lubrication needs will save you time and extend your machine is life. Always start troubleshooting by checking basic connections, bin seating, and thermal overload before moving to deeper diagnostics. Stick to the lubrication schedule based on your usage level, and never feed prohibited materials like staples, adhesives, or plastic. If your shredder displays unlisted error codes, makes grinding noises after reverse attempts, or shows signs of stripped gears, contact professional support rather than attempting internal repairs. Shred smart, maintain regularly, and your Infoguard will deliver reliable, secure performance for years.





