
Tangled paper, crooked tears, and wasted sheets can turn gift wrapping into a frustrating chore. Many people lose up to 20% of their wrapping paper from imprecise cuts and poor handling. The good news is that learning how to use a wrapping paper cutter properly eliminates these problems. Whether you prefer a handheld rotary blade, a tabletop guillotine, or an electric auto-dispenser, the right technique saves time and produces crisp, store-quality edges.
This guide walks you through every step of using a wrapping paper cutter safely and efficiently. You’ll discover how to choose the right tool, set up your workspace, load paper correctly, measure accurately, and maintain your equipment for long-term use.
Choose the Right Wrapping Paper Cutter Type

Before cutting anything, identify the type of cutter you own or plan to buy. Each model works differently and requires specific handling.
Manual Rotary Cutters
A manual rotary cutter features a small circular blade that rolls across the paper, usually guided by a straightedge or ruler. This style is popular among crafters and anyone wrapping unusually shaped gifts because it offers excellent control.
Steps for using a rotary cutter:
1. Lay the wrapping paper flat on a clean, hard surface.
2. Position a metal ruler along the desired cut line.
3. Hold the ruler firmly to prevent slipping.
4. Press the blade down and roll it smoothly along the ruler’s edge.
5. Repeat if the paper is thick or layered.
Always roll the cutter away from your body and keep your fingers well clear of the blade’s path.
Guillotine-Style Tabletop Cutters
These cutters feature a fixed paper roll and a sliding or dropping blade bar. They deliver consistent, straight cuts and are common in retail gift-wrapping stations. Operation is simple: feed the paper, align it, and pull the blade across in one smooth motion.
Electric Wrapping Paper Dispensers
Premium electric models automate the process by feeding and cutting paper to a preset length at the push of a button. These are ideal for bulk wrapping tasks but require proper loading and routine sensor cleaning.
Set Up Your Wrapping Station for Success
A well-organized workspace makes a noticeable difference in cut quality and speed.
Pick a Clear, Flat Surface
Choose a wide table or countertop free of clutter. The surface should fully support the width of your wrapping paper roll. If you use a rotary blade, place a self-healing cutting mat underneath to protect both your table and the blade edge.
Mount the Paper Roll Securely
For tabletop dispensers, slide the cardboard tube onto the metal spindle and pull a few inches of paper through the guide slot. The roll should spin smoothly without wobbling. If it feels too loose, tighten the end caps or add a rubber washer to create gentle friction.
Position the Cutter at the Edge
Place the cutting mechanism at the table’s edge so you can pull paper freely without overreaching. Keep scissors, tape, and ribbon within reach but away from the actual cutting zone to avoid accidents.
Load the Paper Without Jams or Wrinkles
Incorrect loading is the leading cause of misaligned cuts and crumpled paper. Follow the procedure that matches your cutter.
Loading Roller Dispensers With Built-In Blades
- Unwrap the paper roll and inspect for snags or damage.
- Slide the roll onto the mounting rod.
- Thread the leading edge through the paper guide slots.
- Pull several inches past the cutting strip.
- Lock the side arms to maintain steady tension.
If the paper curls, run your palm over it with light pressure to flatten it before cutting.
Loading Standalone Guillotine Cutters
- Position the roll behind or beside the cutter.
- Thread the paper through the rollers or over the guide bar.
- Pull the paper across the cutting bed.
- Raise the safety guard.
- Align the paper with the measurement markers at your desired length.
Measure Before You Cut
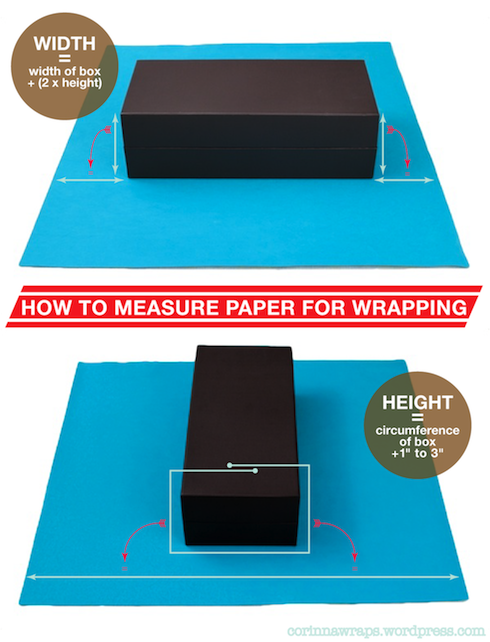
Eyeballing measurements leads to shortages or excess waste. Use these strategies to get it right every time.
Use the Gift as Your Guide
Place the box on the paper and roll it forward one full turn. This gives you the base length needed to cover the gift. Add 2 to 3 inches for overlap, then mark and cut.
Use Built-In Measurement Scales
Most tabletop cutters display inches or centimeters along the base. Align the paper’s edge with the correct mark and pull it out to size before activating the blade.
Mark with Tape for Repeated Cuts
When wrapping multiple identical gifts, place a small piece of colored tape on the table at your target measurement. Pull each sheet to that mark for consistent results.
Make a Clean, Straight Cut Every Time
The cutting technique varies slightly by tool, but the goal is the same: one smooth motion for a clean edge.
Using a Guillotine Blade
- Confirm the paper is aligned correctly.
- Engage the safety latch if your model has one.
- Pull the cutting bar firmly from one end to the other in a single motion.
- Avoid stopping mid-cut, which causes jagged edges.
- Lift the blade and remove your sheet.
Always pull the blade in the direction indicated by the arrow on the cutter. Pushing the wrong way can damage the mechanism.
Using a Rotary Cutter With a Ruler
- Press the ruler down firmly with your non-cutting hand.
- Start at the corner closest to you.
- Apply even pressure as you roll forward.
- Let the blade do the work without pressing too hard.
- Stop just past the paper’s edge.
Replace blades as soon as you notice tearing, which signals dullness.
Using an Electric Auto-Cutter
- Program the desired length on the digital panel.
- Press the Feed button to advance the paper.
- Wait for the sensor to stop the roll.
- Press Cut to activate the blade.
- Pull the sheet free gently to keep edges aligned.
Wipe the sensor lens weekly with a dry cloth to maintain feeding accuracy.
Avoid the Most Common Wrapping Paper Cutter Mistakes
Awareness of frequent errors helps you sidestep wasted paper and damaged tools.
Cutting on Carpet or Soft Surfaces
Soft surfaces compress under pressure and produce uneven, wavy cuts. Always use a hard, level table.
Forcing a Dull Blade
A blunt blade tears paper instead of slicing it and strains your hand. Replace rotary blades every 3 to 6 months with regular use.
Ignoring Safety Guards
Many cutters include shields or locking mechanisms designed to protect your fingers. Never disable or bypass them.
Overloading the Paper Arm
Insert only one roll at a time. Stacking rolls can jam the mechanism and cause misfeeds or crooked cuts.
Maintain Your Cutter for Long-Term Performance

Routine care keeps your cutter functioning like new for years.
Clean After Every Use
Wipe the blade area with a dry cloth to remove paper dust and adhesive residue. For sticky spots, use a cotton swab lightly dampened with rubbing alcohol.
Store Blades Safely
Engage the blade lock on retractable models before putting the tool down. Store in a dry location out of children’s reach.
Inspect for Loose Parts
Periodically check screws, rollers, and mounting arms. Tighten anything that has loosened from repeated use to prevent wobble or misalignment.
Safety Guidelines for Every User
Gift wrapping should be fun, not hazardous. Follow these rules to stay protected.
Keep Your Fingers Clear
Always cut away from your body and position your hands behind the cutting line. Use a push stick when trimming narrow strips.
Supervise Children Carefully
Kids can help by measuring or taping, but let adults handle the cutting. Provide child-safe scissors for any tasks they perform.
Unplug Electric Models After Use
Prevent accidental activation by disconnecting power when finished. Coil cords neatly to eliminate tripping hazards.
Know When to Upgrade Your Cutter
Even the best tools wear out. Watch for these signs that replacement is needed:
- Paper consistently tears or cuts unevenly
- The blade loses sharpness quickly after replacement
- The roller mechanism jams frequently
- Measurement markings are worn or unreadable
Consider upgrading to a model with a self-sharpening blade or digital length control for greater precision and convenience.
Frequently Asked Questions About Wrapping Paper Cutters
What is the best wrapping paper cutter for beginners?
A guillotine-style tabletop cutter is ideal for beginners because it offers clear measurement markings, a stable base, and a simple pull-blade action. It produces straight cuts with minimal skill required.
How often should I replace the blade on a rotary wrapping paper cutter?
Replace the blade every 3 to 6 months with regular use, or sooner if you notice tearing, snagging, or rough edges on the cut paper. Dull blades waste paper and increase hand strain.
Can I use a wrapping paper cutter on foil or metallic paper?
Yes, but apply gentle, even pressure to avoid crushing the metallic coating. Rotary cutters work especially well for delicate or textured papers when paired with a sharp blade.
How do I prevent wrapping paper from curling when cutting?
Run your palm over the paper with light pressure before cutting to flatten it. You can also store rolls in a cool, dry place, since heat and humidity increase curling.
Are electric wrapping paper cutters worth the investment?
Electric models are worth it if you wrap large volumes of gifts regularly, such as for a business or big family. They save significant time and deliver uniform cuts, but casual users will do fine with a manual guillotine or rotary cutter.
What is the safest way to store a wrapping paper cutter?
Engage any blade locks, then store the cutter in a dry drawer or cabinet out of children’s reach. Keep rotary blades in protective sleeves to prevent dulling and accidental cuts.
Key Takeaways for Mastering Your Wrapping Paper Cutter
Mastering how to use a wrapping paper cutter comes down to three essentials: choose the right tool for your needs, set up a clean and organized workspace, and maintain your equipment consistently. Measure every cut, use sharp blades, and always follow safety guidelines to protect yourself and prolong the life of your cutter.
Start by practicing on scrap paper to get a feel for the blade pressure and cutting motion. Once you build confidence, you’ll produce clean, professional-looking edges on every gift. Keep replacement blades and a dry cloth on hand, and your cutter will be ready whenever the next gift-giving occasion arrives.