

You’ve just unboxed your Cricut paper cutter, and now the real fun begins. Whether you’re a total beginner or transitioning from scissors and templates, learning how to use a Cricut paper cutter opens the door to precise, professional-looking projects. This smart machine cuts paper, cardstock, vinyl, and more, but only if you set it up correctly. From unboxing to your first clean cut, the process is easier than you think.
In this guide, you’ll learn exactly how to use your Cricut paper cutter from start to finish. We’ll cover setup, Design Space navigation, material loading, cutting, and troubleshooting, so you can skip the guesswork and start crafting with confidence.
Set Up Your Cricut Paper Cutter the Right Way
A smooth setup prevents most beginner frustrations and ensures accurate cuts.
Power Up and Connect to Your Device
Plug your Cricut into a wall outlet and power it on. Connect it to your computer, tablet, or smartphone using Bluetooth or USB, depending on your model (Explore or Maker series). Open the Cricut Design Space app or visit design.space in your browser to begin.
Always update your machine’s firmware before your first cut. Firmware updates fix bugs, improve connectivity, and unlock new features. If your Cricut won’t connect, restart both the machine and your device, then re-pair through Bluetooth settings.
Install the Fine-Point Blade
For paper and cardstock projects, the Fine-Point Blade is your go-to tool. Open the tool holder clamp on your Cricut, insert the blade cartridge until you hear a click, then close the clamp firmly.
Use only genuine Cricut blades for reliable performance. Dull or off-brand blades tear paper, leave incomplete cuts, and drag material across the mat.
Navigate Cricut Design Space Like a Pro
Design Space is the brain behind every cut, so learning its layout saves time and frustration.
Start a New Project
Log in to your Cricut account at design.space. Click “New Project” to open a blank canvas, or browse the “Projects,” “Images,” or “Stickers” tabs for ready-made templates.
Use the search bar to find popular designs like “birthday card,” “label sticker,” or “paper flowers.” Once you find a design, click “Insert” to add it to your canvas.
Resize, Align, and Arrange Your Design
Drag the corner handles to resize your design. Keep all elements at least 0.25 inches apart to prevent overlap during cutting.
Use the Align tool to center text or shapes on the virtual mat. If you’re cutting multiple copies, select the design, click “Duplicate,” and use “Grid Copy” to fill the mat efficiently and save material.
Choose and Prepare Your Paper
The right paper choice directly impacts cut quality and machine performance.
Pick the Best Paper for Your Project
Cricut machines handle a variety of paper types with ease:
– Printer paper for lightweight designs
– Cardstock (light, medium, or heavy weight)
– Patterned scrapbook paper
– Sticker paper with printable backing
Avoid warped, curled, or heavily textured paper. These materials don’t stick well to the mat and often cause jams or shifted cuts.
Set the Correct Material in Design Space
Click “Material” on the canvas and select your paper type from the dropdown list, such as “Cardstock – Light” or “Patterned Paper.” Design Space automatically loads recommended settings for cut pressure, blade depth, and pass count.
For custom or unknown paper weights, choose “Custom” and run a test cut on a small scrap piece first. This prevents wasted material and confirms your settings are dialed in.
Load Paper onto the Cutting Mat

Your sticky mat holds everything in place, so proper loading is critical.
Apply Paper to the Mat Smoothly
Remove the protective film from a new mat. Place your paper on the mat with the top edge aligned to the mat’s top grid line.
Smooth the paper down with your hands or a scraper tool, working from the center outward to push out air bubbles. For small or slippery pieces, secure the corners with washi tape or painter’s tape.
Insert the Mat into Your Cricut
Press the Load button (a flashing arrow) on your Cricut. The machine prompts you to insert the mat.
Slide the mat into the machine gently, keeping it straight. The rollers will grip and pull the mat in automatically. Wait for the machine to finish measuring the mat before proceeding to cut.
Send Your Design to the Cricut for Cutting
Now comes the exciting part: watching your design come to life.
Preview the Cut Job
In Design Space, click “Make It.” The software displays a preview of your mat layout, including the number of cuts, material placement, and estimated time.
Double-check that the material setting matches your paper and that the correct blade is installed. For multi-layer designs, Design Space splits the cuts across different mat previews.
Start the Cutting Process
Click “Continue,” then “Send to Machine.” The Cricut begins moving the blade across the mat.
Watch the first few seconds closely to confirm:
– The blade moves smoothly
– Paper stays flat and doesn’t lift
– No error messages flash on the screen
For thick cardstock or layered designs, the machine automatically performs multiple passes to ensure a clean cut.
Unload and Weed Your Finished Cut
Once cutting finishes, it’s time to reveal your design and clean up the excess.
Remove the Paper from the Mat
Press the Unload button. When the mat stops moving, gently peel your paper away at a 45-degree angle to avoid curling or tearing.
For intricate cuts like script fonts or detailed patterns, use a weeding tool to lift small sections carefully without ripping the paper.
Weed Away the Excess Paper
Weeding means removing the parts of paper you don’t want in your final design. Use tweezers or a hook tool to pull out inner cutouts, like the center of an “O” or “A.”
Work on a well-lit surface. A light pad or bright desk lamp makes it easier to spot tiny pieces. For sticker paper, keep the cut shapes (positive pieces) and discard the backing.
Keep Your Cricut in Top Shape
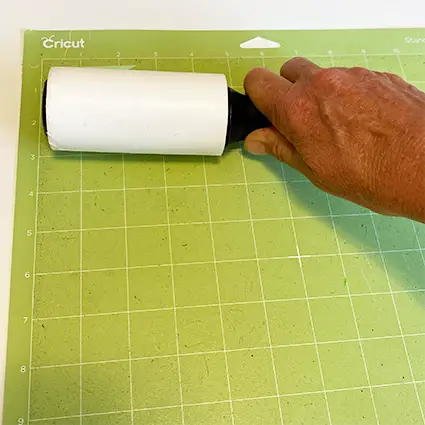
Regular maintenance extends your machine’s life and keeps cuts accurate.
Clean the Cutting Mat
After each session, fold the mat gently to dislodge loose paper bits. Use a lint roller to pick up small debris, or spray a mat restorer to refresh the adhesive.
If the mat loses stickiness, wash it under lukewarm water and let it air dry completely. Avoid soap, as it can break down the adhesive.
Clear the Blade and Rollers
Remove the blade and tap it gently to dislodge trapped paper fibers. Use a small brush or compressed air to clean inside the housing.
Wipe the rollers with a dry cloth to remove dust buildup. Dirty rollers cause misfeeds, crooked cuts, and paper jams.
Fix Common Cricut Cutting Problems
Even experienced users run into issues. Here’s how to solve the most frequent problems.
Paper Won’t Cut All the Way Through
Incomplete cuts usually point to blade or settings issues:
– Replace the blade if it’s older than six months
– Increase cut pressure in Design Space’s custom settings
– Run a test cut on scrap paper to confirm settings
– Ensure the blade housing is fully tightened in the clamp
Paper Shifts or Moves During Cutting
Skewed or misaligned designs mean the mat isn’t holding the paper securely:
– Press the paper down more firmly when loading
– Use tape for small, thin, or slippery pieces
– Lower the cut speed in advanced settings for delicate materials
– Avoid stacking too many layers on one mat
Machine Jams Mid-Cut
If your Cricut stops suddenly or makes grinding noises:
– Pause the machine and unload the mat immediately
– Check for paper jams or blade obstructions
– Reinsert the mat and resume the cut
If the problem persists, power cycle the machine and reconnect via Bluetooth.
Level Up Your Cricut Skills
Once you’ve nailed the basics, these tips help you tackle more advanced projects.
Save and Organize Your Designs
In Design Space, click “Save” and give your project a clear name. Create folders to sort projects by occasion, such as “Birthday Cards,” “Holiday Crafts,” or “Home Decor.”
Upload SVG files from trusted design sites to expand your creative library. Design Space accepts SVG, PNG, and JPG files for custom uploads.
Try Advanced Features
Upgrade to Cricut Access for thousands of premium images, fonts, and ready-made projects. Explore the Print Then Cut feature: print your design on sticker paper, then let the Cricut cut precisely around the printed edges.
For cardmaking and box projects, add the Scoring Wheel to create clean fold lines. This tool scores paper without cutting through it, making assembly easy and professional.
Frequently Asked Questions About Using a Cricut Paper Cutter
What materials can a Cricut paper cutter handle?
Cricut paper cutters work with printer paper, cardstock, scrapbook paper, sticker paper, and more. Heavier materials like thick cardstock may require a Deep-Point Blade for clean cuts.
Do I need the internet to use my Cricut?
Yes, Design Space requires an internet connection to load projects, access images, and send cut jobs. However, you can use Cricut’s offline mode for some basic functions after initial setup.
How do I know which blade to use?
Use the Fine-Point Blade for paper, vinyl, and lightweight cardstock. Switch to the Deep-Point Blade for thicker materials like leather or dense chipboard. The Premium Fine-Point Blade offers extended durability for frequent users.
Can I use any paper with my Cricut?
While Cricut handles most paper types, avoid warped, curled, or overly textured options. These materials don’t adhere well to the mat and often cause jams or incomplete cuts.
How often should I replace the cutting mat?
Replace your mat when it loses stickiness or shows visible wear, typically every 30 to 40 uses. Clean it regularly to extend its life.
What’s the difference between Cricut Explore and Maker machines?
Explore machines handle most paper, vinyl, and iron-on projects. Maker machines offer more power, adaptive tools, and the ability to cut thicker materials like fabric and basswood.
Key Takeaways for Mastering Your Cricut Paper Cutter
Learning how to use a Cricut paper cutter comes down to three essentials: proper setup, correct material settings, and routine maintenance. Start by installing the Fine-Point Blade, connecting to Design Space, and running a test cut on scrap paper. As you grow more comfortable, explore advanced features like Print Then Cut and custom uploads to expand your project possibilities.
Ready to start crafting? Power up your Cricut, open Design Space, and cut your first design today. The more you practice, the faster you’ll turn out clean, professional-looking paper projects.





